| Spring Security OAuth 2 客户端支持完全攻略 | 您所在的位置:网站首页 › resttemplate 返回map › Spring Security OAuth 2 客户端支持完全攻略 |
Spring Security OAuth 2 客户端支持完全攻略
|
在上一篇文章我留了个小尾巴,我们的新浪微博小助手并不能真正连接新浪微博开放平台获取用户的微博数据。那么在这一小节首先我会首先完善我们的微博小助手代码,让新浪微博小助手能真正代替终端用户获取用户的微博资源。紧接着我会向你介绍Spring Security OAuth2 Client提供的各种个性化定制的入口,以便你能应对日常工作中各种开放平台“奇奇怪怪”的实现。作为锦上添花,在本节的结尾我向你简单介绍OAuth2 Client的源码,以便你更加灵活地应对和适配你日常工作中作为客户端开发者承接的需求。 真正实现微博小助手连接微博的功能自定义令牌响应,补充令牌类型我在上一小节的结尾说明了新浪微博开放平台并没有响应token_type参数给我们,但在RFC 6749中token_type是一个必须的参数,因此使用OAuth2 Client默认的令牌响应转换器会出错。默认的令牌转换器是DefaultMapOAuth2AccessTokenResponseConverter,它在convert方法中会将新浪微博的令牌请求响应数据转换成一个Spring Security OAuth2 Client中的令牌响应对象——OAuth2AccessTokenResponse。OAuth2AccessTokenResponse主要包含两个子对象:访问令牌对象(OAuth2AccessToken)和刷新令牌对象(OAuth2RefreshToken),很明显,这是我们在之前讨论的令牌请求成功的主要产物。如下在构建访问令牌对象(OAuth2AccessToken)时约束了令牌类型的必要性。 public OAuth2AccessToken(TokenType tokenType, String tokenValue, Instant issuedAt, Instant expiresAt, Set scopes) { super(tokenValue, issuedAt, expiresAt); Assert.notNull(tokenType, "tokenType cannot be null"); this.tokenType = tokenType; this.scopes = Collections.unmodifiableSet((scopes != null) ? scopes : Collections.emptySet()); }DefaultMapOAuth2AccessTokenResponseConverter是一个可用的对象,它与我们期望的令牌转换器只有一个差别——那就是没有赋值默认的令牌类型。我们可以新建一个自定义的转换器,将DefaultMapOAuth2AccessTokenResponseConverter组合进来,在调用其convert方法之前赋值一个默认的令牌类型。这其实用到了一种设计模式——适配器模式。我们自定义的令牌响应转换器如下所示。它和DefaultMapOAuth2AccessTokenResponseConverter实现同一个Converter接口,但是CustomTokenResponseConverter组合了DefaultMapOAuth2AccessTokenResponseConverter对象。组合优于继承,这也是面向对象领域一个编码的最佳实践原则。 public class CustomTokenResponseConverter implements Converter { private DefaultMapOAuth2AccessTokenResponseConverter defaultMapOAuth2AccessTokenResponseConverter; public CustomTokenResponseConverter(DefaultMapOAuth2AccessTokenResponseConverter defaultMapOAuth2AccessTokenResponseConverter) { this.defaultMapOAuth2AccessTokenResponseConverter = defaultMapOAuth2AccessTokenResponseConverter; } @Override public OAuth2AccessTokenResponse convert(Map source) { source.put(OAuth2ParameterNames.TOKEN_TYPE, OAuth2AccessToken.TokenType.BEARER.getValue()); OAuth2AccessTokenResponse oAuth2AccessTokenResponse = defaultMapOAuth2AccessTokenResponseConverter.convert(source); return oAuth2AccessTokenResponse; } }那么下面一步是配置我们自定义的令牌响应转换器。 @Bean public SecurityFilterChain securityFilterChain(HttpSecurity http) throws Exception { // @formatter:off http .authorizeHttpRequests((authorize) -> authorize .anyRequest().authenticated() ) .formLogin(withDefaults()) .oauth2Client(oauth2 -> oauth2.authorizationCodeGrant(codeGrant -> codeGrant .accessTokenResponseClient(this.accessTokenResponseClient()))); // @formatter:on return http.build(); } @Bean public OAuth2AccessTokenResponseClient accessTokenResponseClient(){ DefaultAuthorizationCodeTokenResponseClient accessTokenResponseClient = new DefaultAuthorizationCodeTokenResponseClient(); OAuth2AccessTokenResponseHttpMessageConverter tokenResponseHttpMessageConverter = new OAuth2AccessTokenResponseHttpMessageConverter(); tokenResponseHttpMessageConverter.setAccessTokenResponseConverter(new CustomTokenResponseConverter(new DefaultMapOAuth2AccessTokenResponseConverter())); RestTemplate restTemplate = new RestTemplate(Arrays.asList( new FormHttpMessageConverter(), tokenResponseHttpMessageConverter)); restTemplate.setErrorHandler(new OAuth2ErrorResponseErrorHandler()); accessTokenResponseClient.setRestOperations(restTemplate); return accessTokenResponseClient; }我们这样配置的原因是,Spring Security OAuth2 Client使用OAuth2AccessTokenResponseClient接口表示使用授权凭证(例如授权码)向授权服务器的令牌端点“交换”访问令牌行为。它其实是使用了一种重要的设计模式——策略模式。如下图所示。它封装了一组算法,其中DefaultAuthorizationCodeTokenResponseClient是在授权码模式中使用授权码向授权服务器的令牌端点“交换”访问令牌的算法实现类。我们还看到另外一个重要的算法类——DefaultClientCredentialsTokenResponseClient,它是在客户端模式下使用客户端凭证信息向授权服务器交互交换访问令牌的实现。它们的客户(使用者)是另外一个策略类——OAuth2AuthorizedClientProvider,我们在小节的末尾源码分析将会看到它的实现。 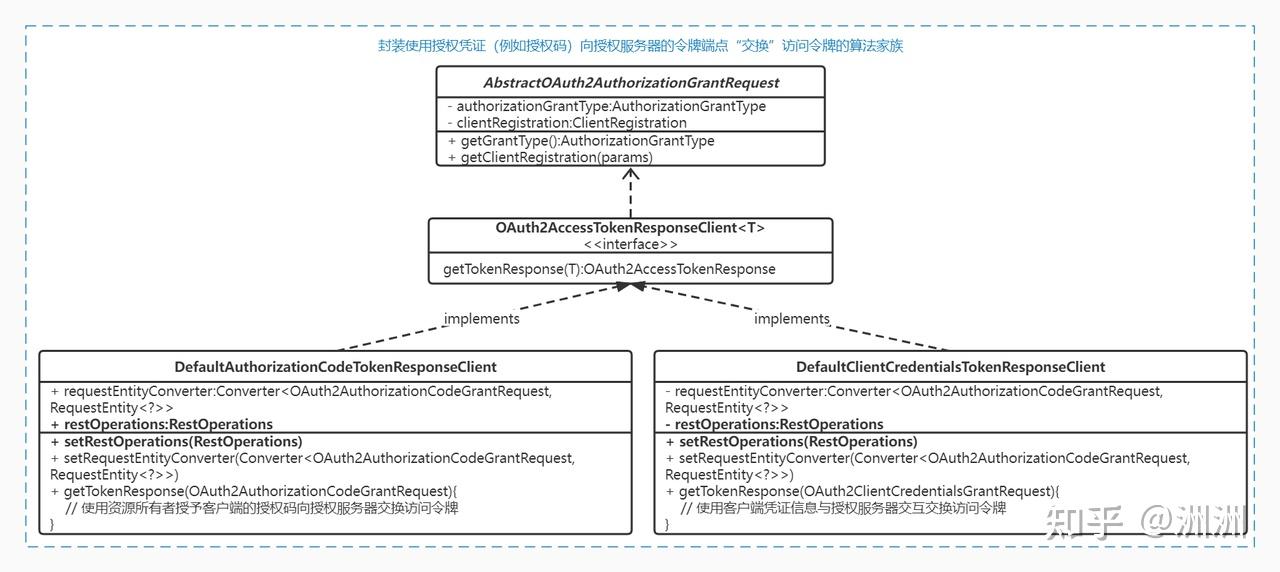 如上图所示,不管是哪个算法类它底层都使用RestTemplate对象发送请求,在上图中的setRestOperations(RestOperations)方法就是配置“运行时的RestTemplate对象”,你可以把RestOperations对象当成RestTemplate对象。实际上它的构造函数中也是这样做的。如下面的代码片段所示。 public DefaultAuthorizationCodeTokenResponseClient() { RestTemplate restTemplate = new RestTemplate( Arrays.asList(new FormHttpMessageConverter(), new OAuth2AccessTokenResponseHttpMessageConverter())); restTemplate.setErrorHandler(new OAuth2ErrorResponseErrorHandler()); this.restOperations = restTemplate; }在RestTemplate对象的构造函数中传入一组HttpMessageConverter对象,其中OAuth2AccessTokenResponseHttpMessageConverter是 OAuth 2.0令牌响应的HttpMessageConverter对象(FormHttpMessageConverter也是必需的,它在发送OAuth 2.0令牌请求时使用)。在OAuth2AccessTokenResponseHttpMessageConverter将授权响应转换成Map对象后,在它里面包装了一个Converter对象,这个对象最终将Map转换成OAuth2 Client想要的OAuth2AccessTokenResponse对象。我们最终需要自定义和个性化的是这个对象——Converter,它的默认实现是DefaultMapOAuth2AccessTokenResponseConverter,我们使用适配器模式重新加工了这个对象,将其适配成满足我们要求的CustomTokenResponseConverter。 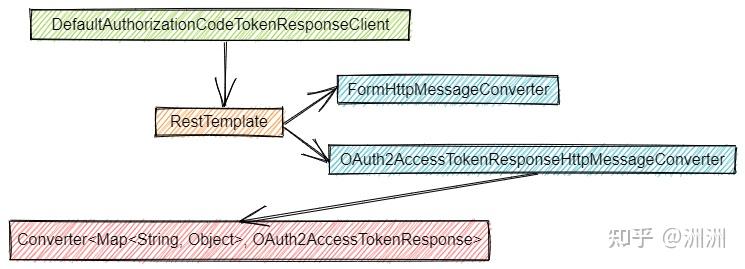 如上图所示,我们的代码就是自上而下的重新构建了这些对象,最终替换了最底层的Converter对象。我着重讲这个配置原理的原因是Spring Security OAuth2 Client自定义其他对象的方法跟定制令牌响应的原理如出一辙,下面的其他自定义配置我将直接给出代码,不赘述其原理。 定制在资源请求中发送访问令牌的方式一般的,有三种在资源请求中发送Barer访问令牌的方式(如果你对这个议题感兴趣,你可以参考https://www.rfc-editor.org/rfc/rfc6750#section-2部分的内容)。 在资源请求的请求头中提供访问令牌。GET /resource HTTP/1.1 Host: server.example.com Authorization: Bearer mF_9.B5f-4.1JqM在请求体中通过名为 access_token的表单编码参数传递,请求的Content-Type必须设置为application/x-www-form-urlencodedPOST /resource HTTP/1.1 Host: server.example.com Content-Type: application/x-www-form-urlencoded access_token=mF_9.B5f-4.1JqM第三种方式是通过在URI查询参数中提供访问令牌,请求的参数名同样是access_token。 GET /resource?access_token=mF_9.B5f-4.1JqM HTTP/1.1 Host: server.example.com新浪微博要求使用第三种方式向其发送访问令牌。但是默认的,我们使用WebClient的attributes(oauth2AuthorizedClient(authorizedClient))方法解析和发送令牌使用第一种方式,即在请求头中提供访问令牌。因此我们需要定制化WebClient发送访问令牌的方式。如下我们剔除了attributes(oauth2AuthorizedClient(authorizedClient))方法,在查询参数中添加了access_token参数。 @Controller @RequestMapping(path = {"/weibo/api"}) public class WeiboResourceController { private final WebClient webClient; public WeiboResourceController(WebClient webClient) { this.webClient = webClient; } @GetMapping("/home_timeline") String explicit(Model model, @RegisteredOAuth2AuthorizedClient("weibo") OAuth2AuthorizedClient authorizedClient) { // @formatter:off String body = this.webClient .get() .uri(uriBuilder -> { return uriBuilder.path("/statuses/home_timeline.json").queryParam("access_token", authorizedClient.getAccessToken().getTokenValue()).build(); })// 设置资源访问的子路径,并且在请求查询参数中携带了access_token访问令牌 // .attributes(oauth2AuthorizedClient(authorizedClient)) .retrieve() .bodyToMono(String.class) .block(); // @formatter:on model.addAttribute("body", body); return "response"; } @GetMapping("/user_timeline") String implicit(Model model, @RegisteredOAuth2AuthorizedClient("weibo") OAuth2AuthorizedClient authorizedClient) { // @formatter:off String body = this.webClient .get() .uri(uriBuilder -> { return uriBuilder.path("/emotions.json").queryParam("access_token", authorizedClient.getAccessToken().getTokenValue()).build(); }) // 设置资源访问的子路径,并且在请求查询参数中携带了access_token访问令牌 // .attributes(oauth2AuthorizedClient(authorizedClient)) .retrieve() .bodyToMono(String.class) .block(); // @formatter:on model.addAttribute("body", body); return "response"; } }测试和验证万事俱备,现在我们启动应用看看整体的效果。 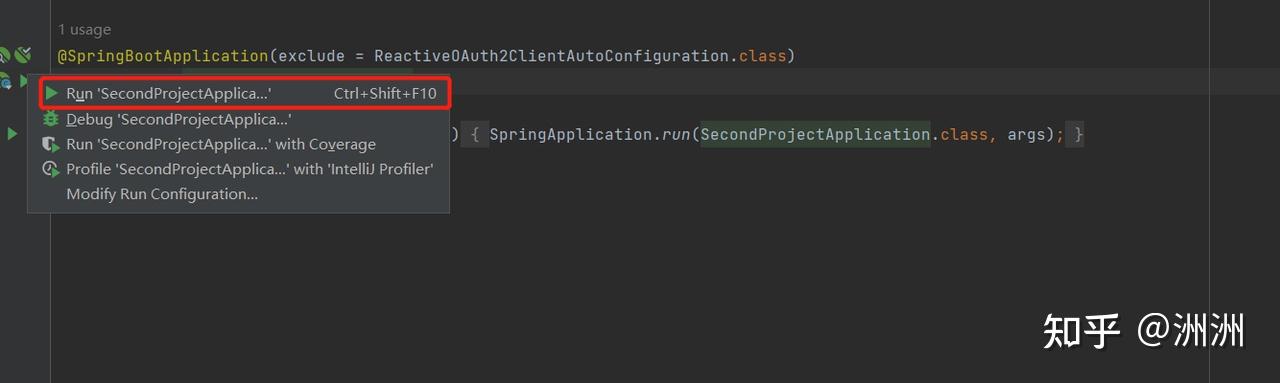 在浏览器中访问127.0.0.1:8080/,跳转到新浪微博小助手的登录页面(这个登录页面是Spring Security默认生成的登录页面,它是由DefaultLoginPageGeneratingFilter生成的HTML页面)。如下图所示。  使用用户名zhouzhou,密码123登录(这是我们配置自定义的UserDetailsService Bean的结果),我们跳转到新浪微博小助手的首页。  点击下面任意一个链接,Spring Security OAuth2 Client将自动开始引导授权、获取访问令牌和请求相应的资源,OAuth2 Client为我们处理了所有这些繁琐的流程。如果你没有登录,新浪微博要求你进行登录。 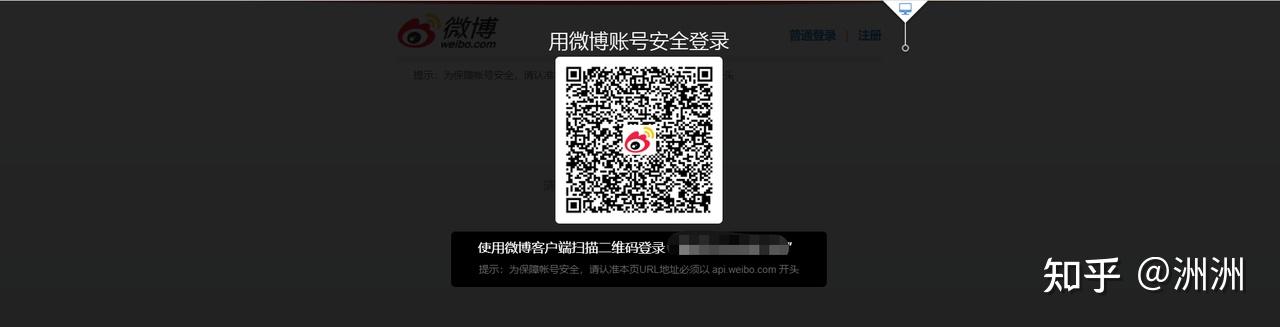 否则,你会看到资源请求的结果。到此,我们的新浪微博小助手顺利代替终端用户访问了其托管在新浪微博的资源——微博数据。 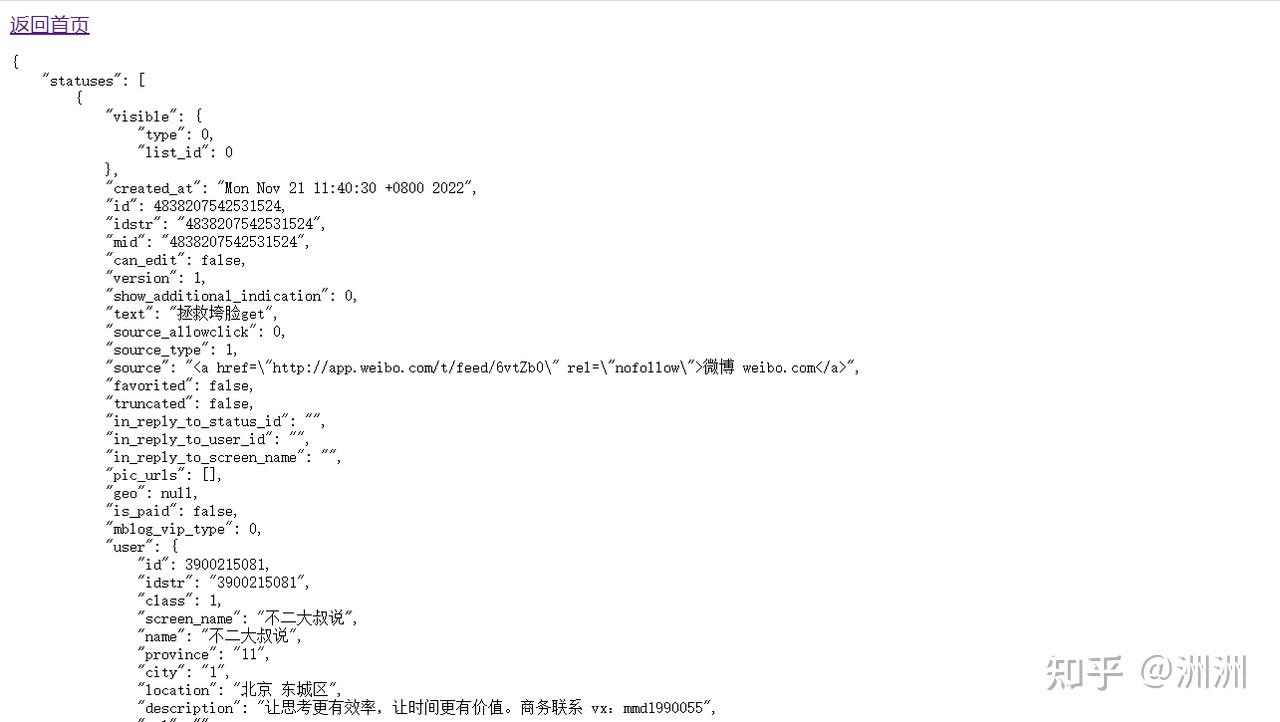 更多的定制化 更多的定制化我在上面讨论了如何自定义令牌响应。Spring Security OAuth2 Client提供了更多的定制化入口。这些入口为你应对日常各种“稀奇古怪”的对接需求提供了便利和可能。下面我将为你呈现这些定制的方式。它们配置的原理跟我上篇配置令牌响应的原理如出一辙,对此我将直接给出代码,不再赘述其原理。 定制授权请求我们可以在授权请求中添加额外的参数。为了做到这一点,我们需要实现我们自己的OAuth2AuthorizationRequestResolver,该类被OAuth2AuthorizationRequestRedirectFilter用来初始化授权请求。例如在新浪微博开放平台的授权请求中提供了标准参数外的其他参数(我们已经在授权请求中讨论了这些标准参数,你可以在这里https://open.weibo.com/wiki/Oauth2/authorize查阅新浪微博授权请求的相关内容),如下图所示。 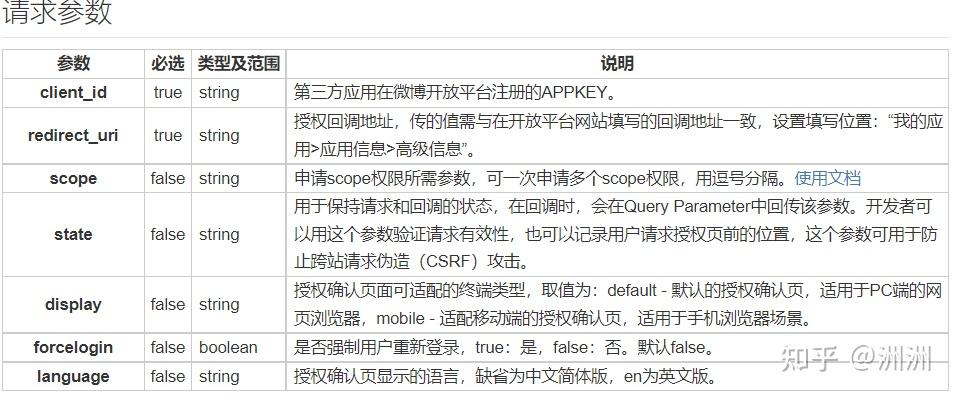 如果我们的新浪微博小助手做大做强,需要支持国际化。我们也要求新浪微博的授权确认页面做国际化处理。我们可以使用上面提供的language参数实现。那么怎么自定义授权请求添加这个额外的参数呢?代码如下所示 public class CustomAuthorizationRequestResolver implements OAuth2AuthorizationRequestResolver { private OAuth2AuthorizationRequestResolver defaultResolver; public CustomAuthorizationRequestResolver( ClientRegistrationRepository repo, String authorizationRequestBaseUri) { defaultResolver = new DefaultOAuth2AuthorizationRequestResolver(repo, authorizationRequestBaseUri); } @Override public OAuth2AuthorizationRequest resolve(HttpServletRequest request) { OAuth2AuthorizationRequest req = defaultResolver.resolve(request); if (req != null) { req = customizeAuthorizationRequest(req); } return req; } @Override public OAuth2AuthorizationRequest resolve(HttpServletRequest request, String clientRegistrationId) { OAuth2AuthorizationRequest req = defaultResolver.resolve(request, clientRegistrationId); if (req != null) { req = customizeAuthorizationRequest(req); } return req; } /** * 添加额外的授权参数 * * @param req * @return */ private OAuth2AuthorizationRequest customizeAuthorizationRequest( OAuth2AuthorizationRequest req) { Map extraParams = new HashMap(); extraParams.putAll(req.getAdditionalParameters()); extraParams.put("language", "en"); return OAuth2AuthorizationRequest .from(req) .additionalParameters(extraParams) .build(); } }在安全配置中插入自定义的配置代码。我缺省了其他无关的代码片段,你可以在SecurityConfig中看到完整的实现。 @Bean public SecurityFilterChain securityFilterChain(HttpSecurity http) throws Exception { // @formatter:off http .authorizeHttpRequests((authorize) -> authorize .anyRequest().authenticated() ) .formLogin(withDefaults()) .oauth2Client(oauth2 -> oauth2.authorizationCodeGrant(codeGrant -> codeGrant .accessTokenResponseClient(this.accessTokenResponseClient()) // 插入授权请求定制的类。我们在授权请求中添加了额外的参数language=en .authorizationRequestResolver(new CustomAuthorizationRequestResolver( clientRegistrationRepository(), OAuth2AuthorizationRequestRedirectFilter.DEFAULT_AUTHORIZATION_REQUEST_BASE_URI)))); // @formatter:on return http.build(); }再一次,DefaultOAuth2AuthorizationRequestResolver是OAuth2AuthorizationRequestResolver的默认实现,我们使用适配器模式,组合OAuth2AuthorizationRequestResolver类的实例,增加了额外的参数。当一切就绪,我们重启请求,此时授权请求如下: https://api.weibo.com/oauth2/authorize ?response_type=code &client_id=3369722647 &scope=statuses/home_timeline account/profile/email emotions &state=2dTl3XKmz6YK5Gl_Kf_FU-Fass5hEAAjdD1Fyd3O0_U= &redirect_uri=http://127.0.0.1:8080/callback &language=en我们重启应用,请求用户微博数据,新浪微博展示了英文的授权页给我们。  集群化配置支持 集群化配置支持Spring Security OAuth2 Client需要在整个授权流程中需要保存一些数据才能保证保证整个授权流程正常流转。默认的它使用session会话或使用基于内存的方式保存这些数据,因此我们需要改造以支持集群化。 授权请求集群化配置Spring Security OAuth2 Client它初始化了授权请求,最重要是它在授权请求中创建了state参数,state参数可以防止CSRF攻击,它是RFC 6749的推荐参数。在用户允许授权后,授权服务器向回调端点发送授权码和state参数,Spring Security OAuth2 Client需要加载初始的授权请求,校验state参数的合法性。这是它保存授权请求对象的一个最直接的理由。默认的它使用应用程序容器的HttpSession实现,我们使用Spring Session可以实现基于Redis或JDBC的集群支持和实现。这是启用应用程序集群的关键,因为应用程序实例不依赖于底层容器的HttpSession,而是集中式地检索会话数据。HttpSession实现了集群化,那么授权请求存储和加载也就实现了集群化。在Spring Security OAuth2 Client中OAuth2AuthorizationRequest代表授权码模式或简化模式下的授权请求对象,而AuthorizationRequestRepository则是持久化OAuth2AuthorizationRequest的“仓库”,HttpSessionOAuth2AuthorizationRequestRepository是它的唯一实现。如下我们将使用SpringSpring session JDBC将会话信息持久到数据库。 我们需要添加以下依赖到项目 org.springframework.boot spring-boot-starter-jdbc org.springframework.session spring-session-jdbc mysql mysql-connector-java2. 在application.yml中配置启用Spring Session的JDBC支持,同时配置MySQL的连接属性。 spring: session: store-type: jdbc jdbc: initialize-schema: always datasource: url: jdbc:mysql://localhost:3306/weibo?useUnicode=true&characterEncoding=utf8&serverTimezone=GMT%2B8&useSSL=false username: root password: root driver-class-name: com.mysql.cj.jdbc.Driver其中spring.session.store-type=jdbc表示启用Spring Session的JDBC支持。使用jDBC来持久化会话信息需要额外创建两张表,这两张表位于“classpath:org\springframework\session\jdbc”下。默认你需要自己创建对应数据库引擎的表。如果你配置了spring.session.jdbc.initialize-schema=always,应用程序启动时将自动帮我们创建好这两张表。 3. 万事俱备,现在我们启动我们的应用程序。当微博小助手执行授权请求后执行令牌请求前,我们观察数据库,对应用户的会话将绑定一个org.springframework.security.oauth2.client.web.server.WebSessionOAuth2ServerAuthorizationRequestRepository.AUTHORIZATION_REQUEST的属性,这里持久化了当前终端用户的授权请求对象。  访问令牌持久化配置 访问令牌持久化配置OAuth2AuthorizedClient代表Spring Security OAuth2 Client中终端用户对客户端的成功授权信息,在它里面关联了终端用户(principalName)、客户端(ClientRegistration)、访问令牌(OAuth2AccessToken)和刷新令牌(OAuth2RefreshToken)这几个对象。一旦用户授权成功,新浪微博小助手获得了访问令牌(和刷新令牌),在访问令牌的有效期内,新浪微博小助手都可以重复加载和使用这个成功授权的对象反复获取用户的资源。默认的OAuth2AuthorizedClient被保存在InMemoryOAuth2AuthorizedClientService中,它将OAuth2AuthorizedClient保存在内存中,很明显为了支持集群化,我们同样要覆盖默认的配置。如下的配置我们将OAuth2AuthorizedClient也保存在了Spring Session会话中。 @Bean public OAuth2AuthorizedClientRepository authorizedClientRepository() { return new HttpSessionOAuth2AuthorizedClientRepository(); }源码分析:Spring Security OAuth2 Client是怎么自动引导授权和获取访问令牌的如下图所示,展示了Spring Security OAuth2 Client工作的主要流程。 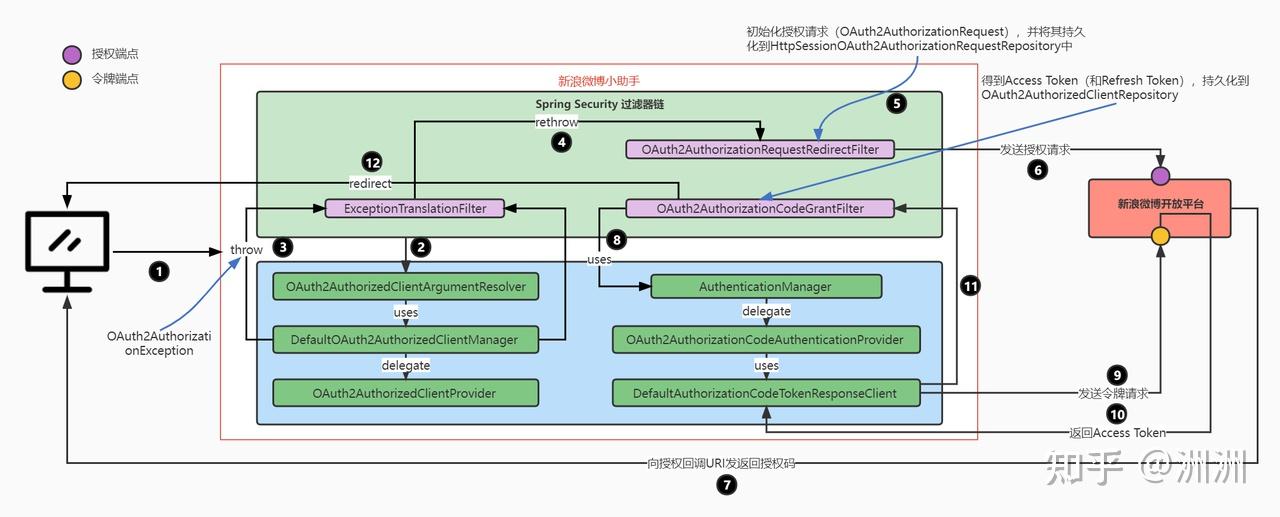 下面我们通过自顶向下的方法分析Spring Security OAuth2 Client工作的整个流程 终端用户请求新浪微博小助手的/weibo/api/home_timeline 端点,获取他关注的用户的最新微博数据。请求会经过Spring Security的过滤器链。当请求到达资源端点,首先,@RegisteredOAuth2AuthorizedClient("weibo") OAuth2AuthorizedClient authorizedClient是入口。OAuth2 Client试图使用OAuth2AuthorizedClientArgumentResolver(OAuth2AuthorizedClientArgumentResolver是一个HandlerMethodArgumentResolver对象,它是一个参数解析器,这是Spring MVC中基础知识,我在此处不再赘述)解析出当前终端用户对新浪微博的有效授权对象——OAuth2AuthorizedClient 。OAuth2AuthorizedClientArgumentResolver调用DefaultOAuth2AuthorizedClientManager来认证和加载一个OAuth2AuthorizedClient对象。在这里它试图调用我们前面解析过的OAuth2AuthorizedClientRepository来加载当前终端用户对新浪微博的授权对象。下面的代码段是DefaultOAuth2AuthorizedClientManager试图利用OAuth2AuthorizedClientRepository加载OAuth2AuthorizedClient对象的过程。 authorizedClient = this. authorizedClientRepository. loadAuthorizedClient(clientRegistrationId, principal,不管是否加载成功,它都会重新组装一个OAuth2AuthorizationContext对象,这个对象包含了OAuth2AuthorizedClient和ClientRegistration以代表当前登录用户的Authentication对象。OAuth2AuthorizedClientArgumentResolver最终将这个对象委托给DefaultOAuth2AuthorizedClientManager进行授权。值得注意的是DefaultOAuth2AuthorizedClientManager非常像Spring Security中用户认证中的AuthenticationManager对象,它间接使用多个AuthenticationProvider对象来认证当前用户。DefaultOAuth2AuthorizedClientManager也间接使用多个OAuth2AuthorizedClientProvider来授权和加载OAuth2AuthorizedClient对象。 4. 很明显,当用户首次使用新浪微博小助手,他没有对新浪微博小助手做过(对新浪微博的)授权,因此无法得到一个授权过的客户端对象——一个有效的OAuth2AuthorizedClient对象。因此它抛出异常——OAuth2AuthorizationException。 5. 这个OAuth2AuthorizationException不会被业务层捕获,它向上抛出到Spring Security的异常处理器——ExceptionTranslationFilter,这个异常不被ExceptionTranslationFilter处理,它继续向上抛出。 // Try to extract a SpringSecurityException from the stacktrace Throwable[] causeChain = this.throwableAnalyzer.determineCauseChain(ex); RuntimeException securityException = (AuthenticationException) this.throwableAnalyzer .getFirstThrowableOfType(AuthenticationException.class, causeChain); if (securityException == null) { securityException = (AccessDeniedException) this.throwableAnalyzer .getFirstThrowableOfType(AccessDeniedException.class, causeChain); } if (securityException == null) { // ExceptionTranslationFilter无法处理该异常,它继续向上抛出。 rethrow(ex); }6. 该异常最终被OAuth2AuthorizationRequestRedirectFilter过滤器捕捉,在这里它可以处理该异常。它初始化授权请求(OAuth2AuthorizationRequest),并且将授权请求对象保存在HttpSessionOAuth2AuthorizationRequestRepository对象中。然后向授权服务器的授权端点发送授权请求。 Throwable[] causeChain = this.throwableAnalyzer.determineCauseChain(ex); ClientAuthorizationRequiredException authzEx = (ClientAuthorizationRequiredException) this.throwableAnalyzer .getFirstThrowableOfType(ClientAuthorizationRequiredException.class, causeChain); if (authzEx != null) { try { // 初始化授权请求 OAuth2AuthorizationRequest authorizationRequest = this.authorizationRequestResolver.resolve(request, authzEx.getClientRegistrationId()); if (authorizationRequest == null) { throw authzEx; } // 引导授权 this.sendRedirectForAuthorization(request, response, authorizationRequest); // this.requestCache.saveRequest(request, response); }7. 在授权服务器校验授权请求的有效性后,通过回调URI向客户端发送临时的授权码。在请求到达OAuth2AuthorizationCodeGrantFilter过滤器的时候,它判断这是一个授权响应。 // 如果请求中包含code和state参数,它认为这是一个授权响应。它应该处理这个请求 static boolean isAuthorizationResponseSuccess(MultiValueMap request) { return StringUtils.hasText(request.getFirst(OAuth2ParameterNames.CODE)) && StringUtils.hasText(request.getFirst(OAuth2ParameterNames.STATE)); }8. 在这里它加载了在发送授权请求时保存在HttpSessionOAuth2AuthorizationRequestRepository的OAuth2AuthorizationRequest对象,同样的,它委托AuthenticationManager来对OAuth2AuthorizationRequest进行认证,OAuth2AuthorizationCodeAuthenticationProvider承担了这一重任,在它的authenticate方法中它校验state参数的合法性(授权请求中state参数值和授权响应中的state参数值一样) // 授权请求中state参数值和授权响应中的state参数值一样 if (!authorizationResponse.getState().equals(authorizationRequest.getState())) { OAuth2Error oauth2Error = new OAuth2Error(INVALID_STATE_PARAMETER_ERROR_CODE); throw new OAuth2AuthorizationException(oauth2Error); }然后它使用一个OAuth2AccessTokenResponseClient的accessTokenResponseClient对象向授权服务器的令牌端点发送令牌响应,我们在自定义令牌响应,补充令牌类型的部分有接触过这个对象。如果授权码正确,授权服务器最终返回了令牌响应对象——OAuth2AccessTokenResponse。 OAuth2AccessTokenResponse accessTokenResponse = this.accessTokenResponseClient.getTokenResponse( new OAuth2AuthorizationCodeGrantRequest(authorizationCodeAuthentication.getClientRegistration(), authorizationCodeAuthentication.getAuthorizationExchange()));9. 当这一切结束,客户端得到了终端用户对新浪微博小助手成功授权的结果对象——OAuth2AuthorizedClient。它将这个对象持久化到了OAuth2AuthorizedClientRepository,然后它将用户浏览器重定向回最初的资源请求端点。 Authentication currentAuthentication = SecurityContextHolder.getContext().getAuthentication(); String principalName = (currentAuthentication != null) ? currentAuthentication.getName() : "anonymousUser"; OAuth2AuthorizedClient authorizedClient = new OAuth2AuthorizedClient( authenticationResult.getClientRegistration(), principalName, authenticationResult.getAccessToken(), authenticationResult.getRefreshToken()); // 持久化了授权过的客户端对象——OAuth2AuthorizedClient this.authorizedClientRepository.saveAuthorizedClient(authorizedClient, currentAuthentication, request, response); String redirectUrl = authorizationRequest.getRedirectUri(); SavedRequest savedRequest = this.requestCache.getRequest(request, response); if (savedRequest != null) { redirectUrl = savedRequest.getRedirectUrl(); this.requestCache.removeRequest(request, response); } // 重定向回最初的资源请求端点 this.redirectStrategy.sendRedirect(request, response, redirectUrl);10. 这一次OAuth2AuthorizedClientArgumentResolver成功解析出了一个OAuth2AuthorizedClient,WebClient 可以使用其中的访问令牌对象向新浪微博发送资源请求了。 总结这篇文章里我为你描述了Spring Security OAuth2 Client 为我们提供的各种个性化定制的入口——我们可以很方便的定制我们的授权请求、授权响应、令牌请求和令牌响应。这也是我在之前为你详细描述授权请求和令牌请求的原因。同时我向你阐述了如何OAuth2 Client做集群化配置。这差不多是OAuth2 Client 的全部知识,如果掌握了这部分内容,你将可以灵活使用Spring Security OAuth2 Client 承接各种接入需求。 |
【本文地址】